How To Change Website Permalink Structure & Redirect Site Without SEO Issues | WordPress, Blogger, Custom Sites, Etc.

How To Change Website Permalink Structure & Redirect Site Without SEO Issues | WordPress (WP), Blogger, Custom Sites, Etc.
In this post, you are going to learn how to migrate/change your website including WordPress permalink structure and still retain your SEO and SERP positions without encountering issues.
For you to have searched for ways to migrate or change your WordPress installation's permalink structure without hurting SEO, I assume you already know what a permalink is, so I will go straight into the meat of this post.
Simply put, permalink is the link structure of your website, app or webpage. I will stop at this simple definition (winks). If you need further definition or explanation of the meaning of this term, you can read it up on Wikipedia.
This is probably going to be the most definitive guide on how to change your WordPress permalink structure without facing issues on the internet in 2023 and probably some few years to come.
This is because I will be making reference to some of the most popular redirection plugins you could use to make this possible without any knowledge of Apache or Nginx.
Since the purpose of this post is also to make the process simple, I will not be talking about other ways you could achieve redirection by modifying website files like the .htaccess. This should be reserved for the technical web geeks, though pretty simple, not everyone is comfortable with editing, files, writing, copying or pasting codes.
Redirection plugin for WordPress is the most popular redirection plugin in WordPress repository with over 2 million installs.
Using this plugin to make redirections is pretty simple.
Why would you want to redirect your website posts and pages after WP permalink change?
WordPress is by far the most popular Content Management Systems and powers more than 43% of websites on the internet.
While setting up your WP website, the default permalink structure normally has the post publication date appended to the URL. While this is by no means less than other permalink structures, your choice of permalink structure may depend on the type of website or purpose of the page you intend to run and manage.
The permalink structure with dates is suitable for websites that publish date related content, like news articles, etc. However, if you wish to give more attention to the post name or title than the publication date, you may wish to drop the date from the permalink structure.
But how does it make things complex when WordPress makes it possible to just navigate to a part of the dashboard, toggle on a selection box and click save, and voila the permalink structure is changed?
It's made complex if you've ran your website for some time already. In this case, there are probably backlinks and indexes that are attributable to your pages and posts at this time. Changing your permalink without first putting anything in place that will redirect these indexes, redirects and backlinks to the original posts and pages will leave them with a 404 not found errors.
This is why it's advisable to have the purpose of the website in mind before setting it up, so as to choose the proper permalink structure immediately after the installation.
Not to worry!
Even though you've not made this choice already, there are a number of reasons why you may wish to change your permalink structure anyway, and luckily, there are a good number of plugins for WordPress that makes this process hassle-free.
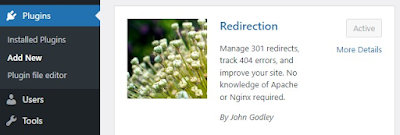
To use the Redirection plugin to migrate your old posts and pages to the new permalink structure, head over to the WordPress repository and search for the plugin, then install it.
 |
| Search for the redirection plugin & click 'Intal Now'. |
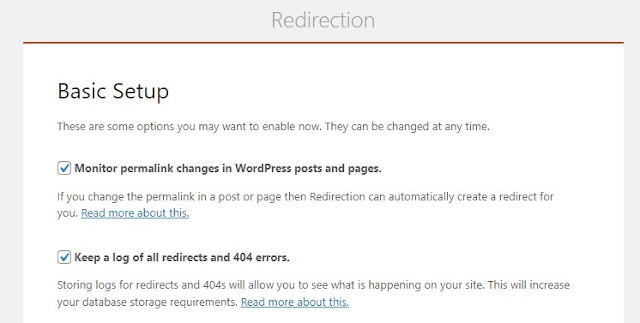
After installing the plugin, follow the quick guide to setup the plugin. While following this guide, make sure you have chosen the option for Redirection to set up redirects automatically. This enables the plugin to monitor permalinks changes on your WordPress site, and automatically create redirects to their new destinations.
After setting up the plugin by following the installation wizard simply by clicking next, selecting the option(s) you'd like to activate, then next until the end of the wizard, the next step, is to set up your current permalink structure in redirection before the actual change.
Why do you need to do this?
You need to do this because from what I discovered, while the automatic redirection works, it does not function for every page or post. Some automatic redirections are also made to the wrong posts. This is why it is important for you to set up a redirect from your old permalink structure to the new one. You can either do this before changing the permalink structure or after changing it.
You can redirect individual posts one by one in Redirection. If your blog/website is not a large one, this is a simple thing to do. If you have a big website however, it will be time consuming to start setting up redirection for every posts on your blog or website.
Redirection has a permalink migration interface for setting up bulk redirects.
This functionality currently is in beta hence, it may not work for some permalink structures. If that's the case with your website, you'll need to use a Regular Expression (Regex) which Redirection also supports.
The good news is that Redirection also provides a means to set up bulk redirects. Like I said earlier, using the redirection plugin or any other plugin to redirect your web pages or posts is just one of the ways of doing this. Other methods include redirecting directly from your domain registrar, redirecting from cPanel or your web server dashboard or interface, redirecting via .htaccess, redirecting through Cloudflare (if you use it), amongst others.
In order to set up the Permalink Migration in Redirection, go to Tools 🠊 Redirection 🠊 Site 🠊 Permalink Migration.
You may need to copy the structure from WP permalink page before executing the change and paste it in the Permalink Migration box in Redirection, then click 'Add Permalink'. This adds the old permalink structure to redirection. Redirection will henceforth use this structure to migrate traffic being routed to this permalink structure to the new one.
If you are migrating from a full date structure to only a post name structure, you'd use this: /%year%/%monthnum%/%day%/%postname%/
If you are changing from a post name structure, you'd use this instead: /%postname%/
You can configure the structure as you deem fit, or copy it from WP dashboard and paste in "Redirection" plugin interface as desired.
Now head over to the Permalinks page in WordPress by clicking "Settings", then "Permalink" and choose the new permalink structure you'd like to use. After making the selection, click "Save".
If your permalink structure is not supported, you can use the regular expression method (Regex).
You can make use of the following Regex for redirection if your permalink structure is not supported in Redirection plugin for WordPress yet.
To set this up, head over to Redirection 🠊 Redirects 🠊 Add New Redirection.
In the box provided, enter the source URL. You will then enter the Regex like this (without the quotes):
"^/\d{4}/\d{2}/\d{2}/(.*)".
You can modify this regex for your specific URL structure. For instance, if your URL is made up of only the year and month, you'd omit the last d{2}.
In the Target URL, input /$1.
This will now route all traffics going to the old permalink to the new one, as the (.*) is a wildcard telling redirect to treat all incoming characters as a redirect source, and the /$1 act as a placeholder for receiving those variables and redirecting them to the exact documents in the new address.
To redirect date, name and category permalink, use:
^/\d{4}/\d{2}/\d{2}/.*?/(.*)
Keep the target the same with the example above.
To redirect all URLs to /blog? except those ones starting with /blog/, use:
Source URL: ^/(?!blog)(.*)
Target: /blog/$1
This is handy if you migrated posts from the main website to a special blog page.
To redirect every page on an old site to a new one one, use:
Source: /(.*)
Target: https://newsitedomain.com/$1
To redirect .html pages in a directory, use:
Source: /blog/(.*?)\.html
Target: /$1/
To remove index.php from a URL, use:
Source: /index\.php/(.*)
Target: /$1/
To remove .html from Blogger pages, use:
Source: ^/(.*?)\html$
Target: /$1/
This is useful for those who are migrating from Blogger (BlogSpot) to WordPress.
To redirect AMP pages, use:
Source: ^/(.*?)/amp/$
Target: /$1/
Redirect AMP pages with query strings (?amp)
Source: ^/(.*?)/\?amp=.*
Target: /$1/
That's how to use the Redirection Plugin to redirect your traffic to your new permalink structure in WordPress.
How to Change Non-WordPress Permalink Structure & Redirect Traffic Accordingly
For a custom website, the location of your site files are determined by the webmaster/administrator which could be you or someone else managing the website. While it is pretty easy to change the permalink structure in WordPress by simply choosing one of the available options and clicking save, changing the permalink structure in a custom website would require some work on your end.
Say you have your site files in the public_html directory including the HTML files that power your web posts and pages. Let's assume you would like to change the structure from post name which invariably would be the name/title of your HTML (PHP or whichever file format or extension powers your posts and pages) files, you would then need to create date based directories for these files and manually move them in accordingly, if you wish to change to a date based permalink.
For other CMSs, they may have a different way of change or customizing their permalinks. Check the documentation for the CMS you are using to learn how you may set a custom permalink for your website.
For those using Google Blogger (BlogSpot), you cannot change the permalink structure without adding some JavaScript codes in your blog's template. Even this is not 100% accurate and may negatively affect SEO.
If you moved or are moving from Blogger to WordPress, you can change your permalink structure from the normal BlogSpot structure to a custom WordPress structure using the method I adduced for Blogger above by making use of the Redirect plugin. It is also possible to do this in CloudFlare using page rules. To learn how to use page rules in Cloudflare, visit this page, or you could use custom permalinks in WordPress to setup your permalink structure to look like the type used in Blogger.
There are other plugins you could use to create redirects in WordPress. If you are making a permanent permalink structure change and you need to permanently route all incoming traffics to the new permalink, a 301 redirect would be most appropriate.
There are many other plugins available in the WP repository for doing redirects apart from Redirection (by John Godley), but the Redirection plugin has the most features yet, is the most popular, and all functionalities are entirely free.
You may also use other plugins like Simple 301 Redirect, 301 Redirects – Easy Redirect Manager, Safe Redirect Manager (by 10up), Redirection (by Inisev).
Was this post helpful, are you stuck anywhere? Let me know your thoughts in the comment section below. Don't forget to share this post with others who may need this guide. Stay blessed!


.png)


Post a Comment